

Here is the simple 3 step process to getting all files ready and sent to us for audio mixing!
Step 1
AAF & Stems Prep & Creation
Before delivering your assets, it's crucial to ensure that your timeline is properly organized and formatted for our audio system.
Duplicate your timeline. Name the new timeline ProjectName_AAF.
Next, organize and name all tracks (see instructions below)
Track Organization & Naming
All audio must be properly organized before exporting your AAF. Below is the required track order for different types of audio.
Note: For a helpful guide on renaming tracks in Premiere, please refer to this tutorial:
Important Notes:
Enable all clips before export. (disabled clips do not come through the AAF)
Remove any clips that are no longer needed. (unused sound effects, alt dialog, etc)
Required Track Order
Organization
First, start by making sure all audio is organized into discrete sections for the three main categories.
• Dialogue
• Music
• Sound Effects
NOTE: There should not be any sound effects on a dialogue channel, music on a sound effects channel, etc.
Organize in the order seen below:
For overlapping dialogue, give characters multiple tracks as needed.
Dialogue (Voiceover mics):
Jessie 1
Jessie 2
Max 1
Alvin 2
Fairy
Village Person
Music (Stereo):
All music must be stereo
Music 1
Music 2
etc
Ambience/Room Tone:
Ambience 1
Ambience 2
etc
Sound Effects:
FX 1
FX 2
etc
Stems Export - Dialogue Only
Strip Audio Effects
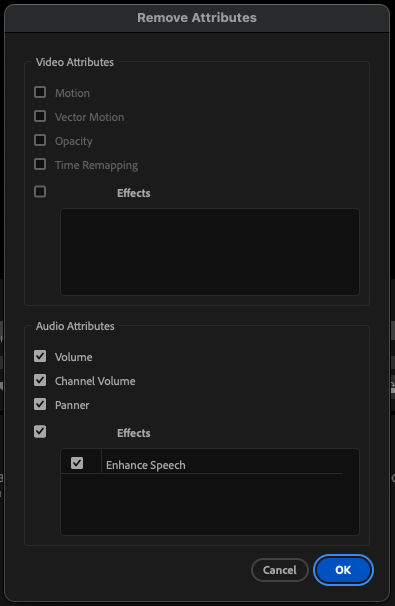
Next, before exporting any stems, please make sure to strip all audio effects except for Pitch Shifter. Pitch Shifter can stay on for the Stems as it allows us to get an isolated pitch-corrected version of each character if needed.
NOTE: While doing this, make sure you are on a duplicate timeline, so you do not lose your original effects in case we need them back later.
To remove all effects, highlight all audio in your timeline, right click, choose “Remove Attributes” from the menu. Make sure all effects are checked, and hit OK, to remove them.
Dialogue
For all Dialogue channels, export a single stem for each track, which means any characters who have more than one track will get multiple stems.
Single Stem per each character with no overlapping dialogue
Multiple Stems per any character with overlapping dialogue
Music & FX:
We do not need stems for music & FX, as we will use the AAF for these.
Audio Format for all stems:
Broadcast WAV
Sample Rate: 48K
Bit Rate: 24
AAF Export
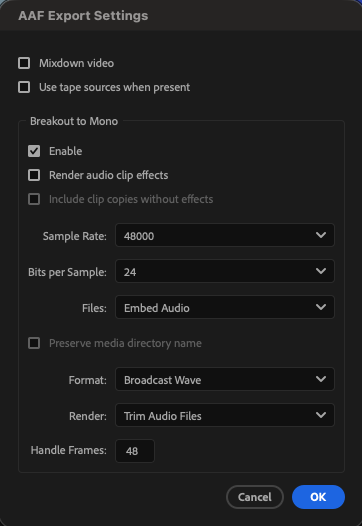
Once all stems are done, it is now time to export the AAF. See screenshot for full settings (Premiere Pro shown in example).
AAF Export Settings
Audio Format: 48K, 24-bit.
Frame Handles: 48 frames.
Embed audio in the AAF.
Step 2
Video Reference File
Video Reference Format: Should match native resolution and frame rate of timeline, and we accept MOV, DNxHD and MP4. 4K preferred.
Please burn in time-code.
Step 3
File Upload
Please upload all files using our WeTransfer portal.
We prefer WeTransfer over Google Drive because Google Drive often adds extra steps and confusion, especially with zipped files.
